Saturday, 17 December 2011

Lithgow Accident van number L1129 Ex NSWGR ACM coach.

Hi all,

Something different the "Lithgow accident van". The model is built from an old kit and I think it was a Rails North. Modeling the late 1980's, I did not think I would ever have a use for an ACM coach. After speaking to a few mates, I was told Lithgow used one for it's accident van, so the model was made based on the Ex ACM re-fitted as number L1129 accident van. I printed the decals on my PC and made a few extra sets If anyone needs any, shoot me an email.

Later,
Dean

Tuesday, 13 December 2011

Last days for a NSWGR 47 class loco

Hi all,

Just finished a weather job on Trainorama 4701 based on photos of 4714. I was going to do a number change to 4714, however I could not find a decal to mach, so 4701 it stayed. Just a basic weather job using dry brush, powders and the oil stains are 50/50 black + gloss clear thinned 50/50 with water.

Dean 

Monday, 21 November 2011

NSWGR HO scale NZBF Ballast Plough KIT

Hi all,

Some of you may know, but for those that don't, I have a NZBF ballast plough kit for sale. The kit comes with brass etch steps and brake wheels, white metal plough wheels, bogies, decals and polyurethane castings. The kit does not come with couplers.

Price is...Now sold out. Other styles of plough coming soon 

If you would like one please email me or see December 2011 AMRM page 80 for phone details. You can also visit www.railsinsacle.com.au

Dean

Friday, 18 November 2011

Columbia models BCW

Hi all,

In this blog we look at a Columbia models BCW. The model did not take much work too bring it from a toy train into a model train. I used a craft knife to give the smooth wood a weather worn look, added some cattle, and new AR kits bogies.

I first painted the wood white and the steel bracing in rust colour. I also used weathering powders to colour over the white with light and dark gray tones. I then used rust powder over the steel bracing. I removed the roof (not an easy job, it's glued well). Finally, I added some livestock and made a new thinner roof from a tin can!

I got this idea for the roof from the tin one that came with the Stephen Johnson models BCW kit and this model is almost a carbon copy so the steel roof worked out well.

One last note If your thinking of buying these models try to see them before you buy as there somewhat toy like and some of my modeling mates have not been happy with the price charged for the models based there basic appearance. However that being said, with a bit of work, you can come up with a good looking model that I believe was worth putting in the effort.

Dean

Saturday, 5 November 2011

Weathered NSWGR NPRX Cement hopper

Hi all,

In this blog,we look at an AR kits NPRX hopper, with Keiran Ryan models brass etch detail parts.

By adding some etch detail and under body parts, you can come up with a very nice model that's comparable to the ready-to-run models coming out of China. The model was built and painted in gray primer (from a spray can), then gloss clear was brushed where the decals would be placed. Then the decals were added and sprayed with flat clear.

The weathering powders were used to complete the model. I did not see the need for a silver top coat, as silver needs a lot of clear to make decals adhere well, and would be lost under layers of weathering powder anyway.

Just like the prototype, it has lost it's raw aluminum finish under layers of cement dust. 

Later,
Dean


Sunday, 9 October 2011

NSWGR CDY / NOCY weathered open wagon

Hi all,

In this blog we take a look at an AR Kits NOCY open wagon. With smooth sides, this is an ideal wagon for weathering damaged sides and rust. The whole model was painted with a brush! I dont use an airbrush much for weathering, as the model sometimes can look over weathered and often the spray pattens and splatter can be seen from the airbrush, giving the model an unrealistic look.

I use soft brushes (often the cheap jobs) and thinned paint and build the layers up to give the effect of years of service. 

Dean


Sunday, 28 August 2011

Weatherd WHX Wheat hopper

Hi all,

With so many ready-to-run- models out there, it is hard to keep up with what is new.

I have around 9 lay-buys going at once! Paying for so many models is only possible for me because of the easy payment deals the manufacturers have in place. Sadly Austrains don't do lay-buy so I'll give them a miss.

I spotted a set of hoppers on Ebay and had just sold a few items myself, so I went for it! This is what I have came up with. The whole model was weathered with powders and a coat of  flat clear between each dusting a total of four layers. It may sound like a lot of work, but is was quite fast. I don't think I spent any more than an hour on each model.

Later,
Dean


Monday, 15 August 2011

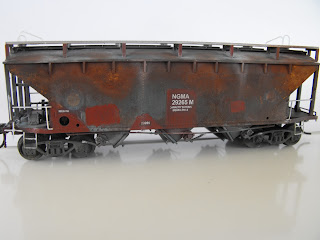
Victorian railways V/Line lime hopper

Hi all,

In this blog I have a Victorian Railways V/Line hopper. The hopper is an ex-wheat hopper converted to carry lime from Victoria into New South Wales in the In the late 1980's.

The white paint is pealing away, and the original silver paint with "BUNGE BULK FLOUR" and "VR" logos are beginning to show though. The wagon is based on a mix of 3 photos taken in 1975, then early 1984, and again sometime in 1989.

Later,
Dean


Saturday, 9 July 2011

WASH ME LOCO 8133

Hi all,

In this blog we have 8133 in need of a wash!  The model is based on the 81 class locos on the cover of Railway Digest issue December 1988, showing 8122 and 8132 trailing the rebuilt 4527. Both the 81's are heavily blackened from working coal to Port Waratah.

Unlike the 44 class below, the paint is still well kept. It's just covered in soot and coal dust, and in need of a wash. One reason for the paint not showing signs of wear, is the fact that the locos are working coal and not passenger coaches, where they do get plenty of washing.

This combined  with the harsh caustic based detergents and scrubbing by maintenance staff,  has left some locos not just in need of a wash, but a repaint!

Later,
Dean


Tuesday, 17 May 2011

The hard working 44 class

Hi all,

For this blog we have a well worked 44 class and as you can see it has done a lot of work over the years!

The model is based on the 44 and 442 class locos, which ran on the Far North Coast of NSW in the late 1980's, and early 1990's.

The weathering may seem over the top, however, if you have seen photographs of the locos that worked the North Coast, they were all in need of a repaint. Subsequently, most stayed this way until their last days with the state rail of NSW.

I always try to weather to suit the years I model. Sadly this poor condition suits the late 1980's 44's and 442's very well.

Until next time,
Deano


Sunday, 27 March 2011

Weathering Locomotives

Hi all,

For my first blog I have some locomotive photos taken on the Bowen Creek layout.

The weathering is a mix of washes and powders. On almost all my models, the weathering is done in this manner. When weathering, I rarely use an airbrush. The washes and powders technique gives greater control than an air brush, and allows you to target smaller areas of the model.

I feel that even with the best double action airbrush, the models just look over weathered. However I still use an airbrush for exhaust, soot, and under body grime in small, thin doses!

For my next blog, I'll take a look at a "44" class with extreme weathering, using a very interesting technique. Until then, I hope sharing my photo's with you all, assists in your weathering ideas.

Deano


Sunday, 20 March 2011

Weathering Vans

Hi all,

In this blog we will take a look at both wooden and steel vans.

When weathering wooden rolling stock I try to simulate the gray aged timber, rusty bolts, and steel frame work. I find this easy to do on large planks of wood as found on say, a cattle wagon, but the small louvres on NSW vans can be a real challenge! For this I use gray pencils and dry brushing, as pictured below.


The following steel van with the graffiti earned me an equal first place in the On Track models weathering competition. The competition rules were that one of the their louvre van models were to be used.

The On Track team informed me it was a very hard decision and in the end could not pick between my entry, and that of Justin Moy. They therefore awarded both of us equal first place.


The following photo is of a Banana Van as often seen in the late 80's, transporting bananas from the far north coast of NSW to the Sydney markets.


Most louvre vans finished life in a poor and rusty state. The van below has seen better days!


Our last van is a refrigerated van. Ice would be filled in though the hatches on the top. This practice had well and truly stopped in the years that I am modeling (the 80's). However, I have been told some of these vans were still in service as box vans for items such as fruit.


That's all for now. I'll feature locomotives for my next blog. So stay tuned, and thanks for visiting.

Deano

Saturday, 19 March 2011

Introduction to weathering

Hi all,

Firstly I'd like to show you some hoppers that I have weathered.
In many real life examples, wagons are rarely the same when it comes to rust and weathering. Some may stay relatively unscathed, whilst others seem to deteriorate considerably.
Obviously, those working close to the sea will always rust. Those working inland tend not to rust as much, however the hot unforgiving Australian sun fades the paint. Please note, what the wagons carry will always play a part in weathering your models!
An example would be the difference in weathering a cement hopper, as opposed to a wheat hopper. The cement hopper often has a crusty layer of dried cement, whilst the wheat hopper has a fine layer of dust.

Here are some examples:


Some more examples:

These photos were taken on Andrew Campbell and Ian Millard's Bowen Creek Proto87 layout. This was on display at the 2010 New England convention. Many thanks to Ian and Andrew, for the privilege of using their layout as a backdrop for my work. It brought great realism to the models.


The last photo is of a V/Line hopper. Note the different weathering of the wagon. These brown stains are common amongst the yellow VR and V/Line hoppers of the Victorian rail system.


In closing my first post on this blog I'd like to say thank you for viewing it, and hope you have been inspired to try some weathering. Next blog, I'll post up some some weathered vans.

Later - Deano